|
eric gustavo petersen | cinematographer { i.a.t.s.e. | local 600 } |
||||||||||||||||||||||||||||||||||||
|
|
||||||||||||||||||||||||||||||||||||
|
digital film mastering | understanding the digital intermediate process |
||||||||||||||||||||||||||||||||||||
|
|
||||||||||||||||||||||||||||||||||||
|
|
||||||||||||||||||||||||||||||||||||
|
what is digital film mastering? |
||||||||||||||||||||||||||||||||||||
|
|
||||||||||||||||||||||||||||||||||||
|
Digital film mastering is the process of scanning film elements – that is, converting an analog image into digital values (or Image Data) – and manipulating it in this digital domain to achieve a “digital master” and finally recording it back to celluloid or some video format. The ability to scan a complete show into the digital realm and have unprecedented control over color manipulation and visual effects has been a hope and desire for all involved in making motion pictures. The last few years the number of films that have finished through digital film mastering has gone up as the process improves and the problems are solved. The process is new and the terms “digital film mastering” and “digital intermediate” (or DI) are still going through a process of enhancement as the fundamental creative and technological advantages may soon become a standard practice for post-production on many motion pictures. Digital film mastering is an extension of the cinematographer’s tools and color palette, opening the door to “looks” that have not been possible before. As such, it is important not to separate the cinematographer from the finishing process. And while some great looks can be achieved though DI, digital mastering can’t turn bad lighting into artful cinematography. To quote John Schartzman, ASC, “You can’t polish a turd!” |
||||||||||||||||||||||||||||||||||||
|
|
||||||||||||||||||||||||||||||||||||
|
finishing to film by traditional methods |
||||||||||||||||||||||||||||||||||||
|
|
||||||||||||||||||||||||||||||||||||
|
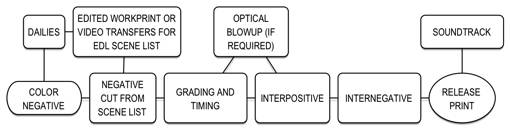
After the film is edited, the conformed original is printed either directly to a release stock or through intermediate materials from which the release print is made. Additional duplication increases a build up of grain and a loss in sharpness. Prints made directly from the camera original are referred to as first generation with each copy adding a generation removed from the original. Optical, special effects, titles are most often one generation and can be two or more. The smaller the film gauge (e.g. 16mm or 8mm) the more noticeable the degradation. The typical workflow from camera original to release print is as follows: |
||||||||||||||||||||||||||||||||||||
|
|
||||||||||||||||||||||||||||||||||||
|
|
||||||||||||||||||||||||||||||||||||
|
|
||||||||||||||||||||||||||||||||||||
|
Color grading is the process of ensuring that from shot-to-shot and all the scenes of a sequence have the same color correction balance and light levels. During the timing session, the lab’s color timer and the director of photography judge the density and color of each scene. The densities of these colors are referred to as “printer lights”, or “points”, and eight points equal one stop of density. The overall range of printer lights is 1 to 50 with most labs preferring to print in the range of 25 to 40. Adjusting the brightness and darkness of a print is done by adjusting the values of all three light points (Red, Green, Blue (RGB) at some labs and Cyan, Magenta, Yellow (CMY) at other labs). If a scene needs to be bluer (or as it is sometime noted, “cooler”) the director of photography might ask that the scene be printed with four points more blue (increasing the amount of blue) and maybe two points less red (increasing the amount of cyan). |
||||||||||||||||||||||||||||||||||||
|
|
||||||||||||||||||||||||||||||||||||
|
finishing with digital film mastering |
||||||||||||||||||||||||||||||||||||
|
|
||||||||||||||||||||||||||||||||||||
|
Above all else, the most significant benefit of digital mastering is the control over a films color manipulation. Once the project is in the digital domain, all the sophisticated color correction “bells and whistles” that have become common place for a video finish, become available for film mastering. Highlights, mid-tones and shadows can not only be timed independently, but contrast can be adjusted, a shot can be recomposed, damage restoration from scratches, hair, flaking, etc. can be made, dissolves and fades can be done without image degradation associated with opticals, color can change within a shot, reference frames can be stored for side-by-side comparisons, grain and noise reduction or amplification can be implemented, image stabilization, “power windows” can modify specific areas within the frame and each color can be altered individually through primary and secondary color correction – in many cases in real time. Moreover, looks that have been traditionally achieved by means of special chemical process (i.e. bleach bypass, cross processing, flashing) can be mimicked quite successfully. |
||||||||||||||||||||||||||||||||||||
|
|
||||||||||||||||||||||||||||||||||||
|
Digital film mastering is just that, “mastering”. The color grading of the film is done - for the most part - once. The resulting file is used to produce the film out master but also for all video versions – domestic and foreign, DVD and VHS, pan-and-scan and letterboxing, etc. The use of Look Up Tables (LUT’s) offer the director of photography, director and editor a reasonable approximation of what the film will look like whether recorded out to film or presented on a television. Look Up Tables refer to a table of conversion factors that are used to transfer information between two differing but, related systems. For example, there is often a requirement to look at digital image material to see what it looks like on a CRT, digitally projected and projected via film – all of which have different characteristics. All this ensures that the cinematographer’s and the director’s vision for the look will be consistent in all release formats. |
||||||||||||||||||||||||||||||||||||
|
|
||||||||||||||||||||||||||||||||||||
|
Having a film production scanned into the digital realm makes for an improved workflow with visual effects. It also provides an efficient way of merging footage shot on diverse formats whether from film or video. |
||||||||||||||||||||||||||||||||||||
|
|
||||||||||||||||||||||||||||||||||||
|
|
||||||||||||||||||||||||||||||||||||
|
|
||||||||||||||||||||||||||||||||||||
|
It’s important to remember that what you have after scanning is essentially a computer file that can be opened, saved, imported and exported. Since many of these operations can easily and directly affect the original image data, care should be taken changing these files format or color space. Failure to take care of the image data can lead to a disappointing result when viewing the final product. |
||||||||||||||||||||||||||||||||||||
|
|
||||||||||||||||||||||||||||||||||||
|
scanning sizes |
||||||||||||||||||||||||||||||||||||
|
|
||||||||||||||||||||||||||||||||||||
|
The bottom line with regards to scanning size is the higher the resolution, the more color information you have to work with – but alas, the more it costs in money and time. Like most post production decision, scanning size needs to be decided early on since it is a decision that’s not only an economical one but, also it will determine how long the project will take to finish. |
||||||||||||||||||||||||||||||||||||
|
|
||||||||||||||||||||||||||||||||||||
|
Here’s how it breaks down. Horizontal resolution is measured in pixels, where one "K" equals 1,024 pixels. At present, the gold standard is a 4K scan – 4,096 pixels horizontally by 3,112 pixels vertically and a file size about 52MB per frame. The resulting full-aperture 4K scan is said to have captured virtually all the information available from the original film. Far more common, less expensive and at a quarter the size of a 4K scan, 2K files are 12MB per frame and measure 2,048 pixels horizontally and 1,556 pixels vertically. Note that scanners (and telecines) typically change scan size to maintain full 2k images regardless of aspect ratio. In case you're wondering, at 2k resolution, full RGB requires 1Tb per hour for storage or about 287 MB per second. |
||||||||||||||||||||||||||||||||||||
|
|
||||||||||||||||||||||||||||||||||||
|
the workflow |
||||||||||||||||||||||||||||||||||||
|
|
||||||||||||||||||||||||||||||||||||
|
Preparation begins, like on any film, during preproduction. Finding a lab and testing for the director of photography is critical in establishing a relationship to achieve the desired look and maximizing the utility of the process. Also during this stage, the producers can gain insight into the costs of the process; what are the requirements to satisfy the workflow of the lab and if needed, visual effects department; and how much time should be scheduled for the film’s completion. |
||||||||||||||||||||||||||||||||||||
|
|
||||||||||||||||||||||||||||||||||||
|
Upon completion of principle photography, the film is edited, locked, and sound finished. At this point, a scan of the cut negative is the most inexpensive and clear-cut method to start the digital intermediate process. This scan is essentially a data clone of the original film image. It produces a file that can be color corrected, titles can be put in and some rudimentary effects work can be accomplished. Most labs recommend this process. Another option is to simply do a portion of the production as a digital intermediate and finish the rest by traditional means. In principle, it would be nice to have all the original footage scanned and available to work with, but the more that is scanned into the system, the more you spend in time and money. In addition, managing that much data can be very, very hard. |
||||||||||||||||||||||||||||||||||||
|
|
||||||||||||||||||||||||||||||||||||
|
One common concern with regards to color correction is the fidelity from the timing environment to the final film print. Currently, the monitoring of the project is done with high-resolution projectors or high definition monitors, contrast and color calibrated to closely match what the release print will look like. While good, they’re not perfect. During a recent panel discussion at Gear Expo 2003, Cinematographer Russell Carpenter discussed one instance he had while grading “Charlie’s Angels 2: Full Throttle” at Efilm (Los Angeles, CA). During the timing of a scene, an object that should have been magenta didn’t appear magenta on the Barco projector. Carpenter knew the color was there – he shot it – and the timer couldn’t explain the discrepancy but knew the color had to be there despite the discrepancy. When the footage was filmed out, the color was in fact there. It just goes to show that the system still needs time to work out the bugs. |
||||||||||||||||||||||||||||||||||||
|
|
||||||||||||||||||||||||||||||||||||
|
At present time, the film scanning and recording process is slow – but getting faster. Scanning is making marked improvements with high-end scanners (specifically, the GrassValley 4K Spirit DataCine) capturing the image data at 24-frames-a-second with a resolution of 2K and 6- to 8-frames-a-second at 4K resolutions. On the other hand, recording can take from 1.5- to 12-seconds-per-frame depending on the recorder and resolution. A 90-minute feature could easily take over five days to film-out. |
||||||||||||||||||||||||||||||||||||
|
|
||||||||||||||||||||||||||||||||||||
|
With regards to scanning, many post houses have opted to use high-definition based telecine technology to speed up the process. The most common and perhaps, the most prolific device, is the GrassValley Spirit DataCine made by Thomson Multimedia. At about 6-frames-per-second that same 90-minute show (the 4K Spirit notwithstanding) can take a little over seven hours to capture making it a much more reasonable and affordable solution. |
||||||||||||||||||||||||||||||||||||
|
|
||||||||||||||||||||||||||||||||||||
|
Two downsides to the Spirit is scan size and color sampling. The DataCine samples colors more crudely resulting in somewhat poorer scans – if you can tell the difference. The limitations become most apparent when complicated visual effects compositing is required. Also, it scans at just below 2K – 1,920 pixels horizontally by 1,440 pixels vertically – and needs to be up-sampled thus potentially increasing the risk of image degradation. These limitations notwithstanding, the Spirit DataCine can and has generated wonderful scans for many feature films, for example, “Hart’s War” (Director Gregory Hoblit and Cinematographer Alar Kivilo – Cinesite) and “Panic Room” (Director David Fincher and Cinematographer Conrad W. Hall - Technique). |
||||||||||||||||||||||||||||||||||||
|
|
||||||||||||||||||||||||||||||||||||
|
Once the grading is done, you end up with a Digital Source Master and can be finished in the following ways: 1) film out by using a laser recorder or CRT system, 2) a Digital Cinema Distribution Master (DCDM) is available in 1080/24P and stored on either D5 or D6 tapes, and 3) an HD Master 1080/24P can be used for various format conversions for television or home video masters (HD, SD, DVD, etc.). Depending on the delivery requirements, the show can be filmed out to an interpositive or internegative on either acetate or polyester (ESTAR) based film stock. Conceivably, release prints can be generated by first striking an internegative thereby eliminating the interpositive step resulting in better quality since the release print is generationally closer to the original negative. During the lab process, it might be necessary to do some minor timing for the release print, but generally this can be done as a “one-light” print. Also, benefiting from the digital intermediate process are projects shot on Super 35 with an anamorphic finish. Depending on the lab, the squeeze can be made either digitally or optically by conventional methods. |
||||||||||||||||||||||||||||||||||||
|
|
||||||||||||||||||||||||||||||||||||
|
The process hasn’t become so widespread as to be inexpensive as of yet. The cost to do a digital intermediate ranges from $120,000 to $250,000 USD. Needless to say, the traditional lab route for film delivery is still cheaper and digital grading often takes significantly more time than conventional film grading. Although two weeks is a fair amount of time to finish a film’s timing, it’s not uncommon to have the cinematographer and/or director spend five to six weeks grading the film in a bay that cost $1000 per hour. While that seems like a hefty amount of money (and in many ways it is), substantial savings can be derived from the fact that the work to prepare the film for its many forms of distribution – theatrical, television, DVD release, etc. – is only being done once. |
||||||||||||||||||||||||||||||||||||
|
|
||||||||||||||||||||||||||||||||||||
|
One acquisition option that is gaining interest is shooting in Super 16 but with a 35mm finish. One such production was “Conspiracy” for HBO (Director Frank Pierson and Cinematographer Stephen Goldblatt). It aired in HD and standard formats, but a 35mm print was also provided for Holocaust museums. The 16mm cameras are small and light and with the use of noise reduction during the color grading very high quality images are possible. If this had to be done photo-chemically, an optical blow-up of the 16mm to 35mm would have been necessary. Such blow-ups magnify the grain. |
||||||||||||||||||||||||||||||||||||
|
|
||||||||||||||||||||||||||||||||||||
|
the lowdown |
||||||||||||||||||||||||||||||||||||
|
|
||||||||||||||||||||||||||||||||||||
|
It’s a brave new world now and more so just around the corner. At present, the goal is to be doing 4K scans all the way through to distribution. How soon that will happen is anyone’s guess. Film is like a cat with nine lives. Every time that someone says, “film is dead” something comes along to give it new life. With the hype about digital acquisition finally dying down, digital film mastering has given film-based origination the chance to breath again. It’s all basic economics, as more people demand digital intermediates for their productions, the supply to meet those growing needs will also increase. |
||||||||||||||||||||||||||||||||||||
|
|
||||||||||||||||||||||||||||||||||||
|
For the cinematographer, all this also marks a change in how we do our job. It seem clear that it will no longer be a couple of days here and there to grade the image, but rather a deeper involvement, often ranging into weeks during post production, as shot-for-shot and scene-for-scene the cinematographer’s hand will fine tune the look and visual feel of the film. |
||||||||||||||||||||||||||||||||||||
|
|
||||||||||||||||||||||||||||||||||||
|
• end • |
||||||||||||||||||||||||||||||||||||
|
|
||||||||||||||||||||||||||||||||||||
|
Here are some products you’ll likely hear about when dealing with digital film mastering. |
||||||||||||||||||||||||||||||||||||
|
|
||||||||||||||||||||||||||||||||||||
|
||||||||||||||||||||||||||||||||||||
|
Thomson Scream (grain and noise reduction) Thomson Shout (image restoration, e.g. dirt and scratches) Thomson Virtual DataCine (server based, non-linear image data storage on disk for real time playback & color grading)
Cintel Oliver (formerly called OSCAR for Optical Scratch Concealment And Removal system - the name was changed because of legal issues with the Academy's "Oscar") Cintel Grace (grain reduction) |
||||||||||||||||||||||||||||||||||||
|
|
||||||||||||||||||||||||||||||||||||
|
|
||||||||||||||||||||||||||||||||||||
|
facilities doing digital intermediates (short list) |
||||||||||||||||||||||||||||||||||||
|
|
||||||||||||||||||||||||||||||||||||
|
||||||||||||||||||||||||||||||||||||
|
|
||||||||||||||||||||||||||||||||||||
|
|
||||||||||||||||||||||||||||||||||||
|
fun with numbers |
||||||||||||||||||||||||||||||||||||
|
|
||||||||||||||||||||||||||||||||||||
|
||||||||||||||||||||||||||||||||||||
|
|
||||||||||||||||||||||||||||||||||||
|
film formats (quick list) |
||||||||||||||||||||||||||||||||||||
|
|
||||||||||||||||||||||||||||||||||||
|
||||||||||||||||||||||||||||||||||||
|
|
||||||||||||||||||||||||||||||||||||
|
|